Showing posts with label project. Show all posts

Saturday, March 17, 2012

Sweater to Skirt Project

How-To   DIY: Sweater to Skirt and Booties Project

If you know me you know that I have sweaters. Not just one or two but many, many more. I not only love to wear them, I like to cut them up and make them into other unique items to wear.
     I found this sweater and knew that I would never wear it just like it was and that it needed some transformation.  It later became a skirt and the sleeves became booties or house slippers perfect for cold winter nights.
Here's how it's done  :)

From this


to this.....
Cut sleeves off
First cut the sleeves off the sweater. Cut seam at shoulders so the top is all the way opened. This will become the bottom of your skirt.

Make a casing and add elastic
Fold the bottom over and make a casing to put the elastic band in. This will be the top of your skirt. Measure your waist with the elastic then cut about an inch shorter. I like my elastic to be a little loose. Use a saftey pin to lead the elastic thru the casing. Careful not to let it twist inside, it will be uncomfortable if the elastic gets flipped. Pull thru and sew elastic closed overlapping the ends. Close up the casing.
Finished skirt
I finished the bottom edges where the neckline and sleeves were. After the sleeves were removed it made slits on each side. You can leave those open or sew them closed. I sewed mine together a little but left some slit on each side.  Skirt is DONE! You can stop there or make the booties to match  :)

Making the booties
Time for the booties. I used a shoe and cut around it on a piece of old sweatshirt to make the bottom of the bootie.
   Turn the sleeve inside out and sew the arm hole to the sweatshirt cut out.
After I sewed it together I had to go back and take in the back of the leg a little. It didn't take much to make it fit snuggly.

Stitch bottom to leg
Booties are DONE!

You can add puff paint to the bottom when you are done if you want to keep from slipping.

Ta-Da!  You are done. New outfit from just one sweater. You can wear the booties in your boots as warmers or just lounging around the house.


Happy Crafting
~FriggleFraggle~


Saturday, February 11, 2012

T-Shirt Bags Project

              T-shirt Bag Project!

Ok, who is ready for another project? This one is quick and easy. You can make one or many in just a short time.

 All you will need is:* some old t-shirts that you love but are stained or you have grown tired of wearing but just can't get rid of,-those are the best :)  *a good pair of scissors and *a safety pin.

Now, Go grab those shirts and Get ready for some fun.


Step 1: Pick your shirt and cut off the sleeves. I cut them on the outside of the seam so the seam is left on the shirt. It seems to give it a little more support, as they will be your handles, but this is up to you. Cut open the sleeve at the seam and cut off the sewn edge. With the sleeve open cut it into long 1/4" wide strips. These are important, they will be the ties for the bag. Pull the strips so they stretch out. Set the strips aside for now.

Step 2:Cut off the neck. Start on one side of the neck and cut down toward the bottom of the shirt then curve around to follow slightly below the ribbed neck line. This will be the opening for your bag.

Step 3:Make 3 small cuts in the bottom seam of your t shirt, make sure you don't cut thru the sewn seam that holds it together. Space them equally apart. I cut one slit on the top- in the middle and two on the bottom -about a quarter of the way in on each side. Just eye it or get your tape out but it won't matter if you are close  :) This should make a little casing to slide your fabric thru.
Step4:Time for the little strips of fabric that you put to the side. Take the 3 longest ones and put a safety pin on one end of one. Slide it thru one cut section of the shirt seam. Then do the same for the other two sections. Your strips should be long enough they won't slip back thru the other side.

Step 5:Pull each section tight. Tie the sections. I double knotted. Then take one strip and tie it to the next section strip all the way around until they have all been tied with another section. (I did this just to make sure it is strong enough, you can tie it how you feel suitable for you).

There! Done! Now you have your very own handmade t-shirt bag.

I made a few. I will be giving some out as gift to friends and family.
We will be doing this craft with the young ladies in our Girl's Club on Monday at Co-op. I hope they enjoy it :)
These are great for carrying groceries, If I can remember to bring them with me!

Let me know how you did.
Happy Crafting!
~Friggle Fraggle~

Up, Down Re-

UP, Down, Re- Cycling that is  :)

Upcycling is the process of converting waste materials or useless products into new materials or products of better quality or a higher environmental value.
The first recorded use of the term upcycling was by Reiner Pilz of Pilz GmbH in an interview by Thornton Kay of Salvo in 1994.[1]
We talked about the impending EU Demolition Waste Streams directive. "Recycling," he said, "I call it downcycling. They smash bricks, they smash everything. What we need is upcycling where old products are given more value not less." He despairs of the German situation and recalls the supply of a large quantity of reclaimed woodblock from an English supplier for a contract in Nuremberg while just down the road a load of similar blocks was scrapped. In the road outside his premises, was the result of the Germans' demolition waste recycling. It was a pinky looking aggregate with pieces of handmade brick, old tiles and discernible parts of useful old items mixed with crushed concrete. Is this the future for Europe?
Downcycling is the process of converting waste materials or useless products into new materials or products of lesser quality and reduced functionality. The goal of downcycling is to prevent wasting potentially useful materials, reduce consumption of fresh raw materials, reduce energy usage, reduce air pollution and water pollution, and lower greenhouse gas emissions (though re-use of tainted toxic chemicals for other purposes can have the opposite effect) as compared to virgin production. A clear example is plastic recycling, which turns the material into lower grade plastics.

Recycling is processing used materials (waste) into new products to prevent waste of potentially useful materials, reduce the consumption of fresh raw materials, reduce energy usage, reduce air pollution (from incineration) and water pollution (from landfilling) by reducing the need for "conventional" waste disposal, and lower greenhouse gas emissions as compared to virgin production.[1][2] Recycling is a key component of modern waste reduction and is the third component of the "Reduce, Reuse, Recycle" waste hierarchy.

To reuse is to use an item more than once. This includes conventional reuse where the item is used again for the same function, and new-life reuse where it is used for a different function. In contrast, recycling is the breaking down of the used item into raw materials which are used to make new items. By taking useful products and exchanging them, without reprocessing, reuse help save time, money, energy, and resources. In broader economic terms, reuse offers quality products to people and organizations with limited means, while generating jobs and business activity that contribute to the economy.

Trashion (a portmanteau of "trash" and "fashion") is a term for art, jewelry, fashion and objects for the home created from used, thrown-out, found and repurposed elements. The term was first coined in New Zealand in 2004[1] and gained in usage through 2005.[2]
Initially trashion was used to describe art-couture costume usually linked to contests or fashion shows; however, as recycling and 'green' fashion become more prevalent, trashion has taken a turn for the more wearable. The term is now widely used in creative circles to describe any wearable item or accessory that is constructed using all or part materials that have been recycled, including clothing that has been thrifted and reconditioned.

*From Wikipedia, the free encyclopedia

What is the difference? Do you know?
They all sound fun to me!

Happy Crafting!
~Friggle Fraggle~

Saturday, January 21, 2012

"No Thread Left Behind" Project

COFFEE COZIES!!

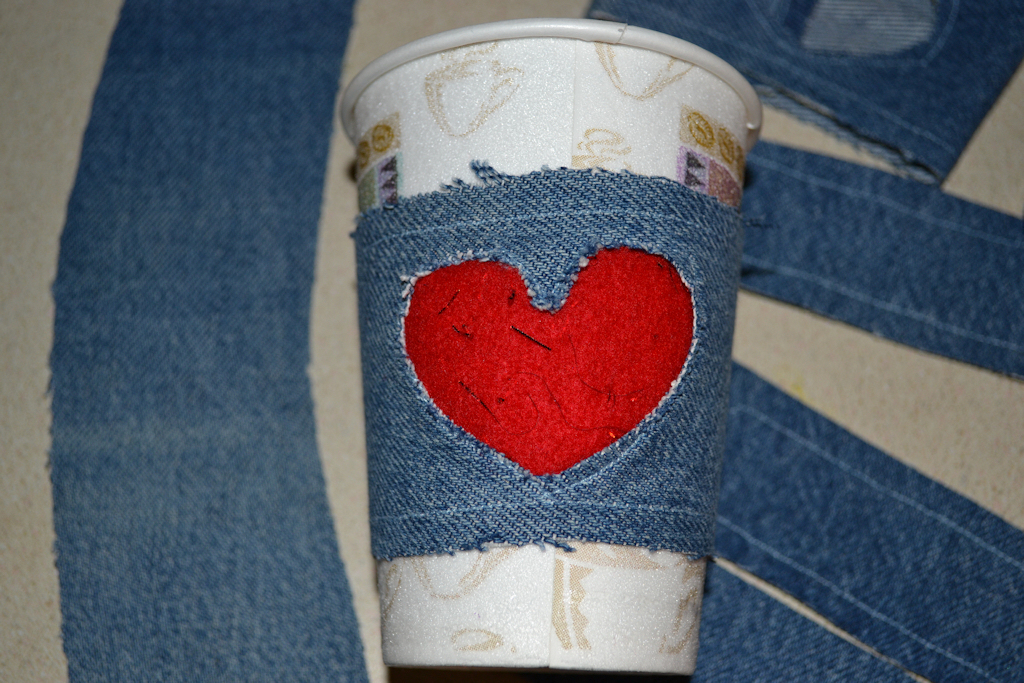
I made coffee cozies with some of the pant leg material from my "No Thread Left Behind" Project.(Trying to use every thread from a pair of old jeans.)

I stitched 3/8" around the edges like the bracelets(see older post), so when I throw them in the washer they will have frayed edges.  Then I cut some heart shapes out of the middle of the cozy.* Make sure to stitch the edge of the heart as well or it might fray too much.

I added red glitter felt to this one.


I will be making more designs soon!


Happy Crafting!
FriggleFraggle

Thursday, January 19, 2012

"No Thread Left Behind" Project

For the first project I decided to make some bracelets. They are always fun and can match with many different outfits and events. There are so many different ways to decorate and accessorize them!

Here I cut strips of different widths and lengths.

Then I stitched a 3/8" seam around each side and added a snap at the ends.
For the worn look like the one on the bottom, I threw it in the washer to fray the edges.                 
*Make sure you stitch first or you might have your edges fray too far.

Here are some wider ones with a felt heart.

I will be making more designs and posting them soon.

Happy Crafting  :)

Wednesday, January 18, 2012

"No Thread Left Behind" Project

"No Thread Left Behind" Project

I took an old pair of jeans and cut it into pieces.

*Note that I kept every piece even the threads and chunks that were falling while I was dissecting, I will be using every thread for something   :)

I cut the jeans into the following:
-Cut the seams off the pant legs, kept the sewn seams and have long pieces of jean fabric w/o any sewn seams now.
-Took the back pockets off with a seam ripper.
-Took the zipper out with a seam ripper. Have a zipper to reuse and some jean chunks from the part that covered the zipper.
-I cut the top of the jeans at the seam at the belt area. I removed the belt loops keeping the belt area whole with the button. Have belt loops separate now.
-If you are careful how you cut the jeans around the belt and pocket area you can end up with "inside out" pockets. The front pocket of the jeans are kept as whole pieces. * in the picture, bottom-middle.


Now to get started on transforming the pieces into something new....


Tutorial: Pictures and Frames

 Hey there! I decided to add in a tutorial for the Salem Witch Academy frames just in case there is someone who needs a little help with tha...